By Vikas Rohilla | Updated: March 2026 | Reading time: ~15 minutes

Let me ask you something. When did you last check how fast your WordPress website loads on a mobile phone?
If your answer is “never” or “a long time ago” — you are not alone. Most WordPress site owners spend weeks perfecting their design, writing content, and setting up plugins. But they completely ignore the one thing that directly determines whether Google ranks them or buries them: WordPress speed optimization.
Speed is not just about user experience anymore. Since Google’s Core Web Vitals update, your page speed is a direct ranking factor. A slow WordPress site does not just frustrate visitors — it actively loses you rankings, traffic, and money.
I built ToolXray after spending months struggling with a slow WordPress site. My mobile PageSpeed score was 58 out of 100. My LCP was 11 seconds. After applying every technique in this guide — all using free tools — I reached a mobile score of 96 and an LCP of under 2 seconds.
This is the complete beginner’s guide to WordPress speed optimization. No technical jargon. No paid tools required. Just clear, step-by-step instructions that anyone can follow — even if you have never touched a line of code in your life.
Before you start: Run a free speed audit at toolxray.com. It takes 10 seconds and shows you exactly which issues are slowing your site down — so you can fix the right things first.
Why WordPress Speed Optimization Matters More Than Ever in 2026
Here is the hard truth: a one-second delay in page load time reduces conversions by 7%, increases bounce rate by 11%, and directly lowers your Google rankings. Those are not estimates — they come from Google’s own research and industry studies.
In 2026, WordPress speed optimization matters for three specific reasons:
- Google Core Web Vitals: Since 2021, Google uses LCP, CLS, and INP as official ranking signals. If your WordPress site fails these metrics, you rank lower than competitors with similar content — even if your content is better.
- Mobile-First Indexing: Google crawls and ranks your site based on its mobile version. Desktop speed is almost irrelevant for SEO. Your mobile speed is everything.
- User Behaviour: 53% of mobile users abandon a site that takes more than 3 seconds to load. Every second counts — literally.
The good news is that WordPress speed optimization does not require expensive tools or a developer. Every fix in this guide can be done by a complete beginner using free tools.
Real result: After applying the WordPress speed optimization steps in this guide, my site went from 58/100 to 96/100 on mobile PageSpeed — with zero paid plugins. The same steps work for any WordPress site.
Step 1 — Choose the Right Hosting (The Foundation of WordPress Speed)
Everything starts with your hosting. No amount of WordPress speed optimization can fully compensate for bad hosting. Your hosting server determines your TTFB (Time to First Byte) — the first phase of every page load.
Here is what good WordPress hosting looks like in 2026:
| Feature | Bad Hosting | Good Hosting |
| TTFB | 800ms+ ❌ | Under 300ms ✅ |
| Server Type | Shared Apache ❌ | LiteSpeed ✅ |
| PHP Version | PHP 7.x ❌ | PHP 8.2+ ✅ |
| Server Location | Far from audience ❌ | Close to audience ✅ |
If you are on shared Apache hosting with old PHP, no amount of WordPress speed optimization will get you a top PageSpeed score. Consider migrating to a LiteSpeed-based host — providers like Hostinger offer LiteSpeed servers at very affordable prices.
How to Check Your Current TTFB
Go to toolxray.com, enter your URL, and check your TTFB in the server health section. Under 300ms is good. Over 600ms means your hosting is the bottleneck.
Step 2 — Install and Properly Configure a Caching Plugin
Caching is the single most impactful WordPress speed optimization technique. Without caching, WordPress builds every page from scratch on every visit — querying the database, running PHP, assembling HTML. With caching, it serves a pre-built static HTML file instantly.
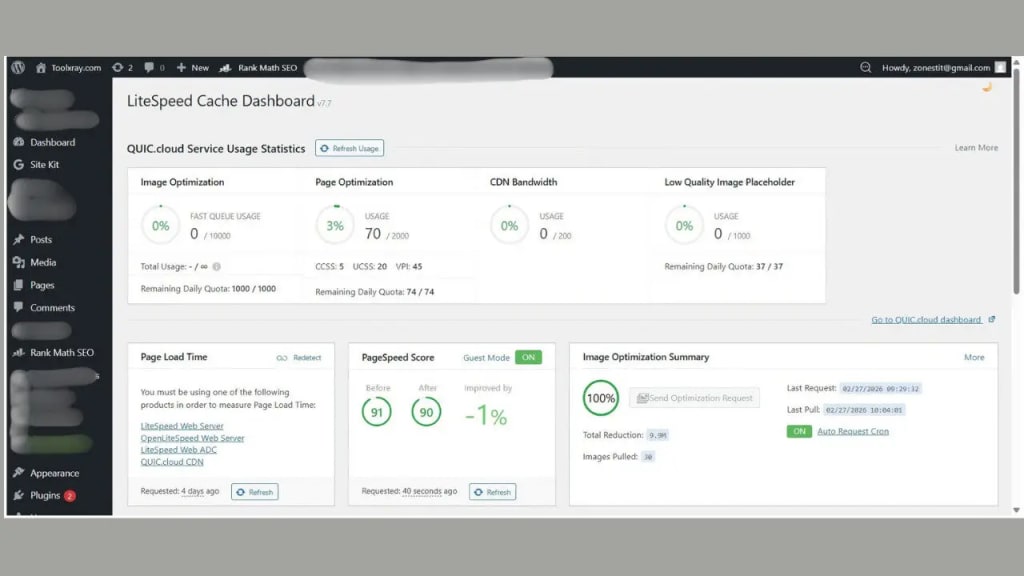
For WordPress sites on LiteSpeed hosting (which I strongly recommend), LiteSpeed Cache is the best free option available. It is not just a caching plugin — it is a complete WordPress speed optimization suite.
LiteSpeed Cache Settings That Actually Matter
Most people install LiteSpeed Cache and leave everything on default. That is a mistake. Here are the specific settings that make the biggest difference for WordPress speed optimization:
Cache Settings:
- Enable Cache: ON
- Cache Logged-in Users: OFF
- Cache Commenters: OFF
- Public Cache TTL: 604800 (7 days)
- Browser Cache TTL: 31557600 (1 year)
CSS Settings:
- CSS Minify: ON
- CSS Combine: ON
- Load CSS Asynchronously: ON (after QUIC.cloud setup)
- Font Display Optimization: Swap
JS Settings:
- JS Minify: ON
- JS Combine: OFF for Elementor sites — inflates file size significantly
- Load JS Deferred: Deferred — NOT Delayed (Delayed breaks mobile menus!)
Critical mistake to avoid: Never set Load JS to ‘Delayed’ on Elementor sites. It breaks mobile navigation menus and causes blank sections. Always use ‘Deferred’ instead.
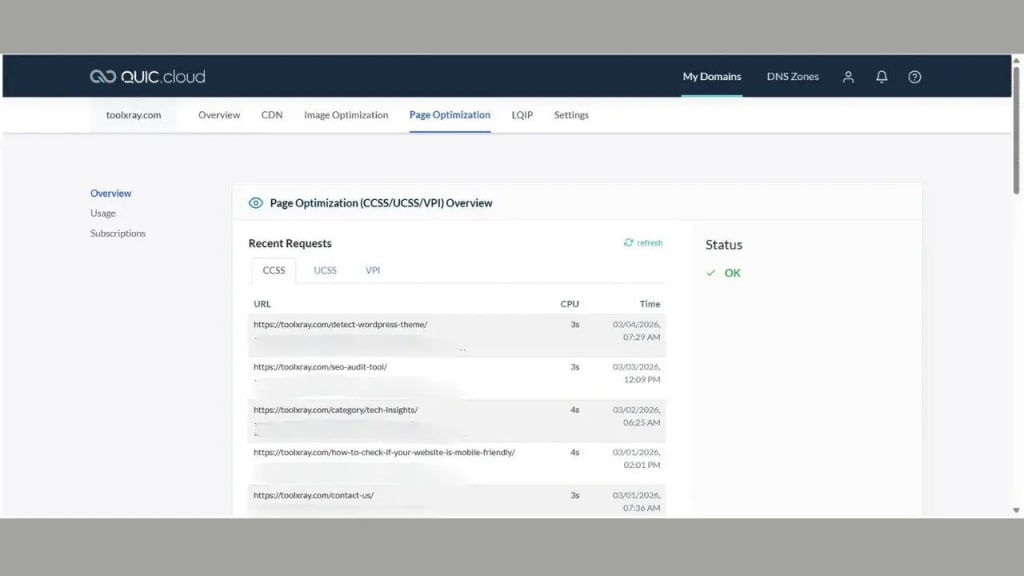
Step 3 — Connect QUIC.cloud for Advanced CSS Optimization
This is the most overlooked step in WordPress speed optimization guides — and arguably the most impactful one after basic caching.
QUIC.cloud is LiteSpeed’s free cloud service that provides two critical features that dramatically improve your PageSpeed score:
- Unique CSS (UCSS): Generates a custom CSS file for each page containing only the styles actually needed on that specific page. A typical WordPress theme loads 150–200KB of CSS sitewide. UCSS strips this to 15–20KB per page.
- Critical CSS: Identifies and inlines the CSS needed to render above-the-fold content instantly, eliminating render-blocking CSS entirely.
Without QUIC.cloud, enabling “Load CSS Asynchronously” in LiteSpeed Cache causes FOUC — Flash of Unstyled Content — where visitors briefly see an unstyled page. QUIC.cloud’s Critical CSS prevents this completely.
How to Set Up QUIC.cloud (Step by Step)
- Go to LiteSpeed Cache → Dashboard in WordPress admin
- Click “Request Domain Key” or “Link to QUIC.cloud”
- Create a free account at quic.cloud
- Connect your domain
- Go to LiteSpeed Cache → Page Optimization → CSS Settings
- Enable “Generate UCSS”
- Enable “Load CSS Asynchronously”
- Go back to LiteSpeed Cache Dashboard → Unique CSS → Force Cron
- Wait 15–20 minutes for processing
After this setup, your render-blocking CSS score in PageSpeed Insights will drop to near zero. On my site, this alone removed 2,710ms of render delay.
Step 4 — Optimize Your Images (The Biggest LCP Win)
Images are responsible for more slow WordPress sites than any other factor. In my experience auditing hundreds of sites with ToolXray, unoptimized images are the number one cause of poor WordPress speed optimization scores.
The problem is not just image file size — it is a combination of wrong format, wrong dimensions, and wrong loading strategy.
Convert All Images to WebP Format
WebP images are 25–35% smaller than JPEG and 26% smaller than PNG — with the same visual quality. In 2026, all major browsers support WebP. There is no reason to use JPEG or PNG for web images anymore.
For existing images: Use Squoosh.app — it is free, requires no signup, and converts to WebP in seconds.
For future uploads: In LiteSpeed Cache → Image Optimization, enable:
- Auto Request Cron: ON
- Optimize Original Images: ON
- Next-Gen Format: WebP
- WebP For Extra srcset: ON
Resize Images for Mobile
Your hero image does not need to be 2000px wide for a mobile screen. Most mobile viewports are 375–768px wide. Serving a 2000px image on a 375px screen wastes bandwidth and slows LCP significantly.
Rule of thumb:
- Hero/full-width images: max 1200px wide for desktop, 768px for mobile
- Blog post featured images: max 800px wide
- Thumbnail images: max 400px wide
Never Lazy Load Above-Fold Images
This is one of the most common WordPress speed optimization mistakes. Lazy loading is excellent for images below the fold — it delays loading them until the user scrolls near them. But if your hero image or above-fold content is lazy loaded, you are deliberately delaying your most important image.
In LiteSpeed Cache → Page Optimization → Media Settings, add your hero image filename or section class to the “Lazy Load Image Exclude” field.
Quick test: In PageSpeed Insights, scroll to ‘Diagnostics’ and look for ‘Defer offscreen images’. If your hero image appears in this list, it is being lazy loaded and needs to be excluded immediately.
Step 5 — Optimize Your Theme and Page Builder
Your WordPress theme is often the most overlooked factor in WordPress speed optimization. A poorly coded theme can add hundreds of kilobytes of CSS and JavaScript to every page — regardless of what caching plugin you use.
Choosing a Speed-Optimized Theme
Not all themes are created equal. Here is what to look for in a fast WordPress theme:
- Lightweight CSS: Under 50KB of theme CSS (before plugin additions)
- No jQuery dependency: Modern themes should work without jQuery or load it only when needed
- Clean HTML: Minimal div nesting, semantic HTML structure
- No built-in sliders or carousels: These load heavy JavaScript even on pages that don’t use them
- LiteSpeed Cache compatible: Explicitly tested and compatible with LiteSpeed Cache optimization
Astra, GeneratePress, and Kadence are the three fastest WordPress themes as of 2026. All have free versions that score 90+ on PageSpeed with proper WordPress speed optimization.
Elementor-Specific Optimizations
If you use Elementor (as most WordPress site owners do), here are the specific WordPress speed optimization settings to configure:
- Elementor → Settings → Performance → Improved Asset Loading: ON — loads Elementor CSS only on pages that use it
- Elementor → Settings → Performance → Improved CSS Loading: ON — reduces inline CSS
- Remove Unused Widgets: In Elementor → Settings → Elements, disable widgets you never use
- Use Native WordPress Font: Avoid loading 3–4 Google Fonts — each adds an extra HTTP request
Step 6 — Fix Render-Blocking Resources
Render-blocking resources are CSS or JavaScript files that prevent your browser from displaying any content until they finish downloading. They are one of the most common issues flagged in WordPress speed optimization audits.
When Google runs a PageSpeed test on your site, render-blocking resources appear in the “Eliminate render-blocking resources” section. Each one adds delay to your FCP (First Contentful Paint) and LCP.
How to Identify Render-Blocking Resources
Run your URL through PageSpeed Insights and scroll to the “Opportunities” section. Look for “Eliminate render-blocking resources”. It will show you exactly which files are blocking render and how many milliseconds each one costs you.
How to Fix Render-Blocking CSS
- Enable Load CSS Asynchronously in LiteSpeed Cache (requires QUIC.cloud for Critical CSS)
- Use QUIC.cloud Unique CSS to strip unused styles
- Add Google Fonts to the CSS Async Excludes list if they cause FOUC
How to Fix Render-Blocking JavaScript
- Set Load JS Deferred to “Deferred” in LiteSpeed Cache
- Add jQuery and jQuery.min.js to JS Deferred Excludes (already done by default)
- Turn JS Combine OFF for Elementor sites
- Add Google Tag Manager to JS Deferred Excludes to prevent analytics issues
Step 7 — Optimize Your Database
Over time, your WordPress database accumulates junk — post revisions, spam comments, transients, orphaned metadata, and trash. This database bloat slows down every query your site makes, directly impacting WordPress speed optimization.
LiteSpeed Cache includes a built-in database optimization tool. In LiteSpeed Cache → Database:
- Clean All Post Revisions: removes old versions of posts
- Clean Auto Drafts: removes unsaved draft content
- Clean Trashed Posts: permanently removes deleted content
- Clean Spam Comments: removes flagged spam
- Clean Expired Transients: removes temporary data that was never cleaned up
Run this cleanup once a month. Enable Auto Clean if your site publishes frequently.
Additionally, enable Object Cache if your hosting supports it. Object caching stores database query results in memory so identical queries return instantly instead of hitting the database again.
Step 8 — Reduce HTTP Requests
Every element on your page — images, CSS files, JavaScript files, fonts, icons — requires a separate HTTP request. More requests = more time to load. WordPress speed optimization is partly about reducing the number of these requests.
Practical Ways to Reduce HTTP Requests
- Use a System Font Stack: Instead of loading Google Fonts (2–3 extra requests), use system fonts. They are already installed on every device and add zero load time.
- Remove Unused Plugins: Every active plugin adds CSS and JavaScript to your site — even on pages that do not use that plugin’s features. Audit your plugins and remove anything you do not actively need.
- Use CSS Icons Instead of Icon Fonts: Font Awesome and similar icon font libraries load an entire font file even if you only use 3 icons. Use SVG icons inline instead.
- Combine CSS Files: Enable CSS Combine in LiteSpeed Cache. This merges multiple CSS files into one, reducing the number of requests — just be aware it can sometimes cause layout issues with complex themes.
- Preload Critical Resources: Use WordPress resource hints to preload your LCP image and critical fonts. This tells the browser to fetch them immediately.
Step 9 — Implement Proper Caching Headers
Browser caching tells visitors’ browsers to store static files locally so they do not have to download them again on subsequent visits. Without proper caching headers, every page load downloads every CSS, JavaScript, and image file from scratch — even for returning visitors.
In LiteSpeed Cache → Cache Settings:
- Browser Cache: ON
- Browser Cache TTL: 31557600 (1 year) for static assets
- Login Cookie: set appropriately for your site
With browser cache properly configured, returning visitors load your site dramatically faster. PageSpeed Insights will stop flagging “Serve static assets with an efficient cache policy” — which is one of the most common warnings on unoptimized WordPress sites.
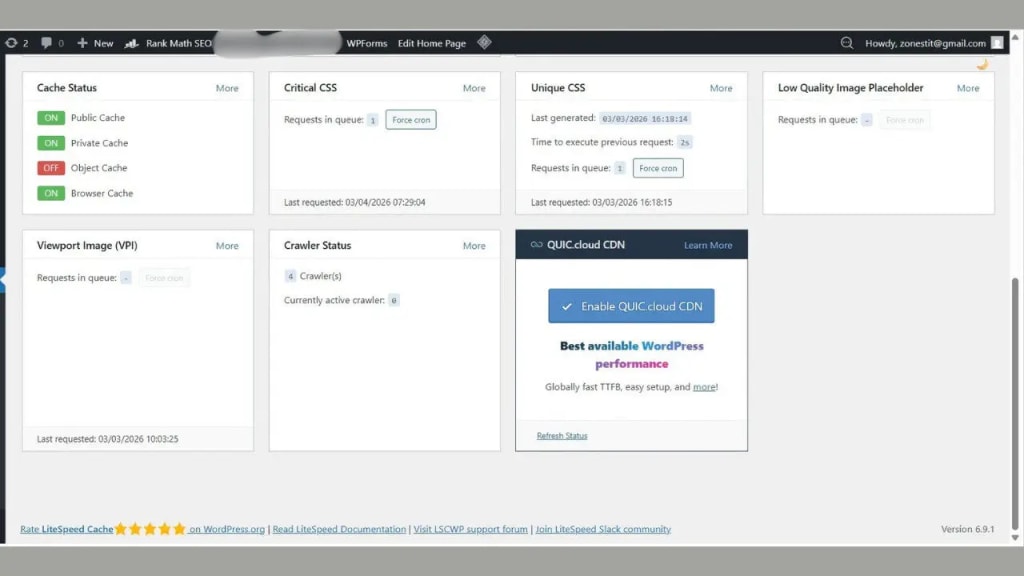
Step 10 — The Force Cron Routine (Critical Step Most Guides Miss)
This is the most important WordPress speed optimization maintenance step that almost no guide mentions — and the one that catches beginners off guard.
Every time you publish a new blog post or page, QUIC.cloud needs to process the new page’s CSS and images. Until it does, the new page loads without optimization — sometimes causing your PageSpeed score to drop significantly.
I learned this the hard way. After publishing a new article, my mobile PageSpeed score dropped from 96 to 58 overnight. The fix was simple — running Force Cron — but I did not know I had to do it.
After every new post, do this immediately:
- Go to LiteSpeed Cache → Dashboard
- Critical CSS → Force Cron
- Unique CSS → Force Cron
- Viewport Image (VPI) → Force Cron
- Wait 15–20 minutes
- Run PageSpeed Insights to verify score is maintained
Make this a habit: Every time you hit ‘Publish’ in WordPress, open LiteSpeed Cache Dashboard and run all three Force Crons. It takes 30 seconds and prevents score drops. Set a reminder until it becomes automatic.
Step 11 — Monitor Your Speed Regularly
WordPress speed optimization is not a one-time task. New plugins, theme updates, new content, and server changes can all impact your speed. Regular monitoring catches problems before they affect your rankings.
Free Tools to Monitor WordPress Speed
- ToolXray — Complete technical SEO audit including speed, Core Web Vitals, and WordPress-specific issues. Free, 10 seconds, no signup.
- Google PageSpeed Insights — The definitive speed test. Always check the Mobile tab first. Run 3 times and average the results.
- Google Search Console — Core Web Vitals report shows real user data. More accurate than lab tests once you have enough traffic.
- GTmetrix — Waterfall chart showing every resource load. Useful for identifying which specific files cause slowdowns.
When to Re-Check Your Speed
- After publishing new content (always)
- After installing or updating a plugin
- After changing your theme or Elementor template
- After changing hosting or server settings
- Once per month as routine maintenance
WordPress Speed Optimization Checklist — Complete Summary
Here is your complete WordPress speed optimization checklist. Work through each item in order:
| # | Task | Impact |
| 1 | Choose LiteSpeed hosting with PHP 8.2+ | ⭐⭐⭐⭐⭐ |
| 2 | Install & configure LiteSpeed Cache properly | ⭐⭐⭐⭐⭐ |
| 3 | Connect QUIC.cloud for Unique CSS + Critical CSS | ⭐⭐⭐⭐⭐ |
| 4 | Convert hero image to WebP & compress | ⭐⭐⭐⭐⭐ |
| 5 | Remove lazy loading from above-fold images | ⭐⭐⭐⭐ |
| 6 | Enable Load JS Deferred (not Delayed) | ⭐⭐⭐⭐ |
| 7 | Optimize Elementor Performance settings | ⭐⭐⭐ |
| 8 | Clean database monthly | ⭐⭐⭐ |
| 9 | Enable Browser Cache with long TTL | ⭐⭐⭐ |
| 10 | Remove unused plugins | ⭐⭐⭐ |
| 11 | Run Force Cron after every new post | ⭐⭐⭐⭐ |
| 12 | Monitor speed monthly with ToolXray | ⭐⭐ |
Fast Hosting = Fast WordPress Site
ToolXray runs on Hostinger — NVMe SSD storage, LiteSpeed server, free CDN, and 99.9% uptime. Starting at ₹69/month.
Get Hostinger — Up to 80% Off →Final Thoughts — Start Your WordPress Speed Optimization Today
WordPress speed optimization might seem overwhelming when you first look at PageSpeed Insights and see a list of red warnings. I know that feeling — I was there too.
But here is what I have learned: you do not need to fix everything at once. Start with the top three items on this checklist — LiteSpeed Cache, QUIC.cloud, and image optimization. Those three alone will get most WordPress sites from a failing score to 85+ on mobile.
The remaining steps are about pushing from 85 to 95+ and maintaining that score over time.
Your action plan for today:
- Run a free audit at toolxray.com — see exactly what is slowing your site
- Install LiteSpeed Cache and configure the key settings from Step 2
- Connect QUIC.cloud and enable Unique CSS
- Compress your hero image with Squoosh.app and convert to WebP
- Run PageSpeed Insights and see your improved score
A fast WordPress site is not a luxury in 2026 — it is the minimum requirement for ranking in Google, retaining visitors, and growing your business. The sites that invest in WordPress speed optimization today are the ones dominating search results tomorrow. Start now. Your rankings depend on it